
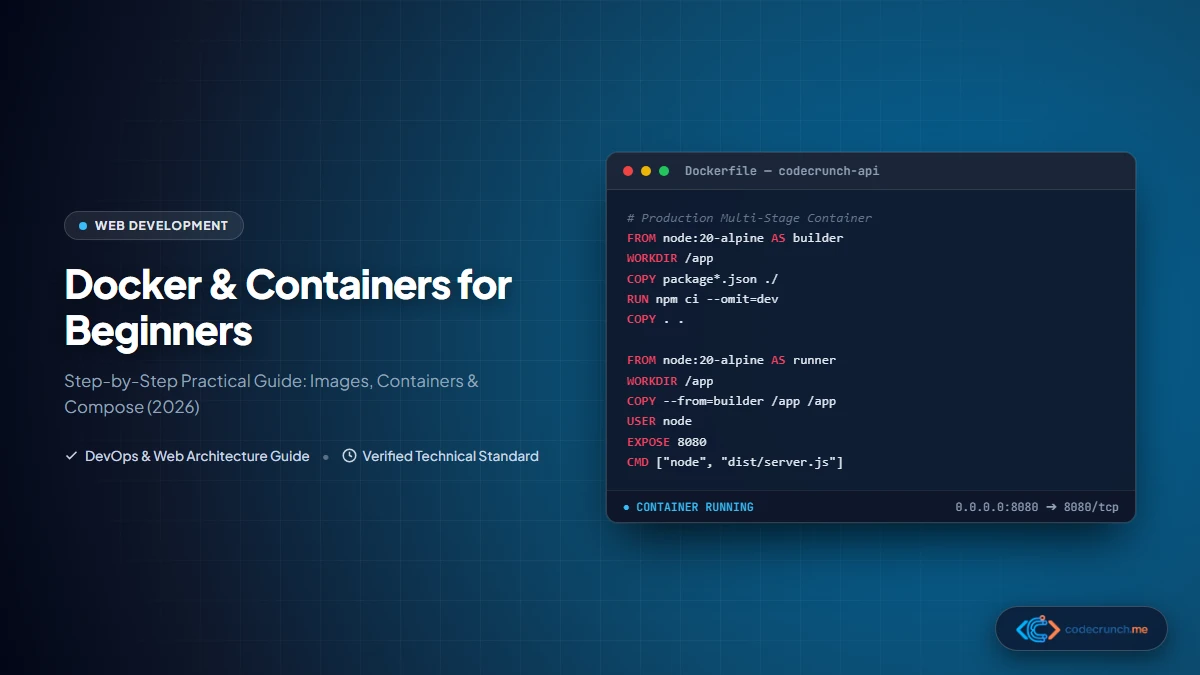
If you have ever written software that worked flawlessly on your local development laptop but crashed immediately upon deployment to a cloud server with the infamous excuse “Well, it worked on my machine!”, you have already experienced the exact problem that containerization solves.
Modern software development is inherently heterogeneous. A typical web application requires specific runtime versions (such as Node.js 20, Python 3.12, or PHP 8.3), operating system shared libraries, database drivers, and environment variables. When moving code between macOS, Windows, staging servers, and Linux production clusters, subtle configuration drift creates catastrophic production outages. In our guide on backend architecture fundamentals, environment consistency is emphasized as a primary pillar of reliable engineering.
Docker eliminates environment drift permanently by packaging an application together with its entire runtime filesystem into a standardized, lightweight unit called a container. In this practical, step-by-step tutorial, you will learn the core mental models behind containerization, master essential command-line workflows, write production-ready Dockerfiles, and orchestrate multi-container microservices with Docker Compose.
- 1. What is a Container? (Containers vs Virtual Machines)
- 2. The Four Primitives: Dockerfile, Image, Container, and Registry
- 3. Installing Docker & Verifying the Engine
- 4. Essential Docker CLI Commands Walkthrough
- 5. Writing Your First Production Dockerfile (Step-by-Step)
- 6. Port Mapping & Container Networking Explained
- 7. Managing Persistent Data: Named Volumes vs Bind Mounts
- 8. Multi-Container Orchestration with Docker Compose
- 9. Common Beginner Mistakes & Troubleshooting Checklist
- 10. Frequently Asked Questions (FAQ)
1. What is a Container? (Containers vs Virtual Machines)
To understand Docker, you must discard the misconception that a container is just a “smaller virtual machine.” While both provide isolation, their architectural mechanisms operate at completely different layers of the computing stack.
A Virtual Machine (VM) virtualizes physical hardware. A hypervisor (such as VMware ESXi, Microsoft Hyper-V, or KVM) creates virtual CPUs, virtual memory, and virtual storage controllers. Each virtual machine must execute a complete, heavyweight Guest Operating System—including its own kernel, device drivers, background daemons, and system utilities. Consequently, VMs take 30 to 90 seconds to boot and consume gigabytes of RAM before your application even starts.
A Docker Container virtualizes the operating system kernel rather than hardware. All containers running on a host share the single host Linux kernel. Docker leverages two native Linux kernel security features to achieve isolation:
- Namespaces: Provide process isolation. A container gets its own isolated process ID (PID) tree, network interfaces (NET), mount points (MNT), and user IDs (USER). Processes inside the container cannot see or interact with processes outside.
- Control Groups (cgroups): Enforce resource metering and constraints. Control groups allow administrators to restrict the exact amount of CPU cores, memory limits, and disk I/O throughput a container can consume.
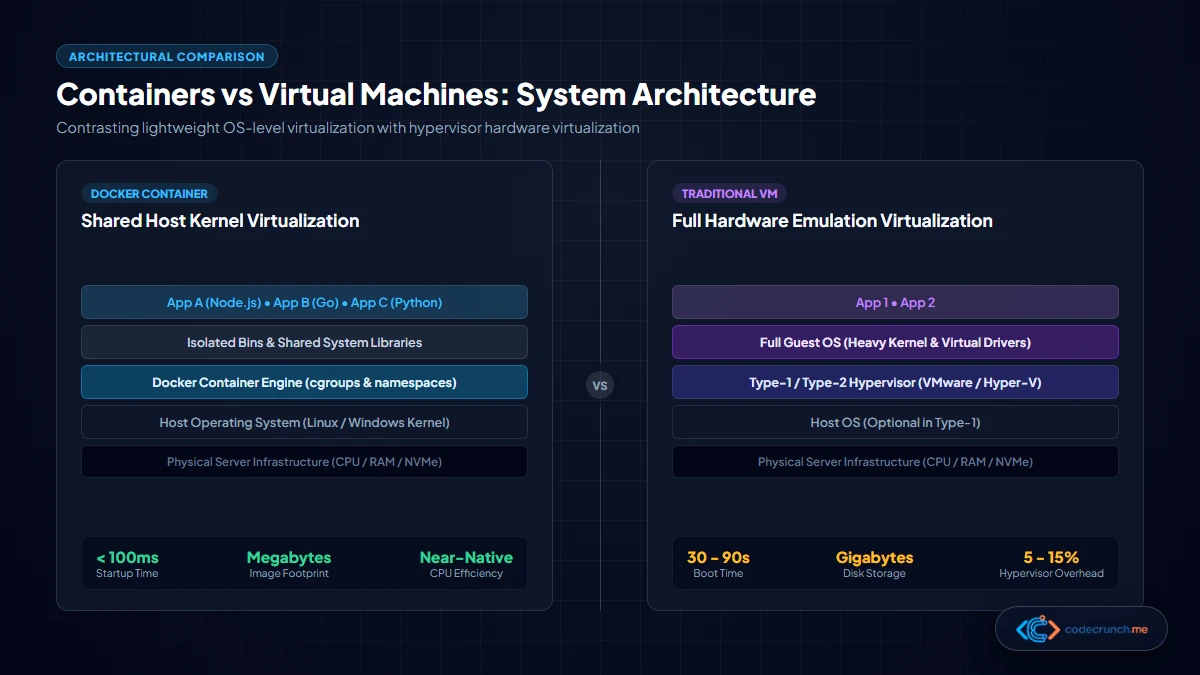
Because containers share the host kernel and run as native OS processes, they start in under 100 milliseconds and introduce near-zero hypervisor CPU overhead. As documented by the Open Container Initiative (OCI), this standardized container runtime guarantees identical execution across any cloud provider or workstation.
| Feature Dimension | Docker Containers | Traditional Virtual Machines |
|---|---|---|
| Virtualization Layer | Operating System Kernel (Namespaces & cgroups) | Hardware Hypervisor (Type 1 or Type 2) |
| Operating System | Shares the host kernel; brings only user-space binaries | Requires a full independent Guest OS per VM |
| Startup Time | Milliseconds (instant process execution) | 30 to 120 seconds (full OS boot sequence) |
| Storage Footprint | 15 MB to 300 MB (Alpine / Slim images) | 15 GB to 50 GB per instance |
| CPU & Memory Overhead | Near-native hardware performance (< 1%) | 5% to 15% dedicated hypervisor emulation overhead |
| Portability | Runs identically on any machine with Docker Engine | Dependent on hypervisor format (VMDK, VHDX, OVA) |
2. The Four Primitives: Dockerfile, Image, Container, and Registry
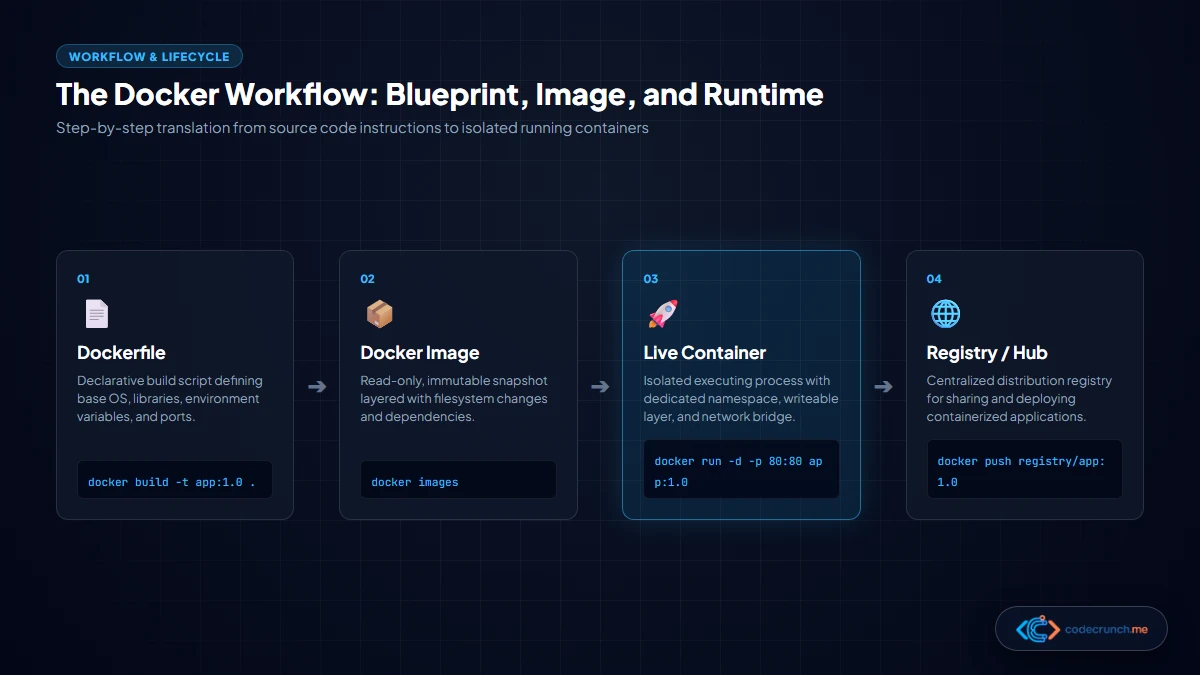
Working effectively with containerized software requires grasping four foundational primitives that describe how code transforms from raw text into a live production service:
- Dockerfile: A plain text configuration file containing declarative sequential instructions (such as
FROM,WORKDIR,COPY,RUN, andCMD) describing how to build a software environment. Think of the Dockerfile as the architectural recipe. - Docker Image: The read-only, immutable binary snapshot generated by compiling a Dockerfile. An image consists of stacked filesystem layers. Once built, an image cannot be changed; any modification creates a new image layer. Think of the image as the frozen blueprint.
- Docker Container: A live, runnable, stateful instance of an image. When you execute
docker run, Docker takes the immutable image layers, attaches a thin read-write filesystem layer on top, assigns a network namespace, and executes the primary process. Think of the container as the live house built from the blueprint. - Docker Registry (Docker Hub): A centralized repository service where container images are cataloged, published, and shared publicly or privately across engineering teams.
3. Installing Docker & Verifying the Engine
Docker is available across all major operating systems. Follow the official installation pathways recommended by the official Docker Documentation:
- Windows 11 / 10: Install Docker Desktop for Windows with the WSL 2 (Windows Subsystem for Linux 2) backend enabled. WSL 2 allows Docker to run natively inside a real Linux kernel on Windows without performance penalties.
- macOS (Apple Silicon & Intel): Install Docker Desktop for Mac, utilizing Apple’s native Virtualization Framework for Rosetta x86_64 emulation if compiling cross-architecture binaries.
- Linux (Ubuntu / Debian / RHEL): Install the headless Docker Engine via the official
aptordnfpackage repositories to maximize server performance without graphical overhead.
Once installed, open your command prompt or terminal and verify that the Docker daemon is running properly:
# Check installed Docker CLI and Server Engine versions
docker --version

# Run the official lightweight test container
docker run hello-world
When you run docker run hello-world, Docker queries your local storage for the image. Failing to find it locally, Docker contacts Docker Hub, downloads the minimal 13 KB image, instantiates the container, prints an informational greeting message to stdout, and exits cleanly.
4. Essential Docker CLI Commands Walkthrough
Every developer needs a concise arsenal of high-frequency terminal commands to inspect, manage, and debug container lifecycles. If you are comfortable using the terminal from our Git command-line tutorial, Docker CLI commands will feel very intuitive.
# 1. Download an official image from Docker Hub without running it
docker pull nginx:alpine

# 2. List all images currently cached on your local workstation
docker images

# 3. Launch an Nginx web server in detached (background) mode with port mapping
docker run -d --name my-webserver -p 8080:80 nginx:alpine

# 4. View currently running active containers
docker ps

# 5. View all containers (including stopped or exited containers)
docker ps -a

# 6. Stream live console log output from a specific container
docker logs -f my-webserver

# 7. Open an interactive bash/sh terminal inside a running container
docker exec -it my-webserver sh

# 8. Gracefully stop a running container (sends SIGTERM, then SIGKILL)
docker stop my-webserver

# 9. Delete a stopped container from disk
docker rm my-webserver

# 10. Delete an unused local image
docker rmi nginx:alpine

# 11. Clean up all dangling containers, unused networks, and untagged images
docker system prune -fdocker run-d(Detached): Runs the container as a background daemon process, returning control of your terminal immediately.--name: Assigns a human-readable identifier (e.g.my-webserver) instead of a random generated string likeboring_einstein.-p 8080:80(Publish): Maps port 8080 on your host machine to port 80 inside the container.-e VAR=value: Injects environment variables directly into the container process runtime.
5. Writing Your First Production Dockerfile (Step-by-Step)
To demonstrate real-world containerization, let us build and package a real Node.js REST API service. In our guide on how modern websites work, server runtimes serve dynamic HTTP responses to browser clients. Here is how to package that service reproducibly.
Create an empty folder named docker-demo, initialize a minimal package.json, and create a server.js file:
// server.js
const http = require('http');

const PORT = process.env.PORT || 3000;
const server = http.createServer((req, res) => {
  res.writeHead(200, { 'Content-Type': 'application/json' });
  res.end(JSON.stringify({
    status: 'online',
    platform: 'CodeCrunch Container Engine',
    uptime: process.uptime(),
    timestamp: new Date().toISOString()
  }));
});

server.listen(PORT, () => {
  console.log(`Server listening on internal port ${PORT}`);
});
Now create a file named Dockerfile (without any file extension) in the same directory. To adhere to industry security standards, we will use an official lightweight Alpine Linux base image and configure a non-root user:
# 1. Base Image: Use the official minimal Node.js 20 Alpine Linux distribution
FROM node:20-alpine

# 2. Set the working directory inside the container filesystem
WORKDIR /usr/src/app

# 3. Copy dependency definitions first to leverage Docker layer caching
COPY package*.json ./

# 4. Install production dependencies only (reproducible build)
RUN npm ci --omit=dev

# 5. Copy the remainder of application source code
COPY . .

# 6. Security Hardening: Switch execution away from root to built-in 'node' user
USER node

# 7. Document the network port exposed by the application
EXPOSE 3000

# 8. Define the default executable command run upon container launch
CMD ["node", "server.js"]
Before building the image, create a .dockerignore file in the project root. Just like .gitignore, this prevents local clutter, security secrets, and bloated operating system files from leaking into your container build:
# .dockerignore
node_modules
npm-debug.log
.git
.env
.DS_Store
Now build your Docker image and run it with two commands:
# Build the image and tag it as 'codecrunch-api:1.0'
docker build -t codecrunch-api:1.0 .

# Run the container, binding host port 8080 to container port 3000
docker run -d --name my-api -p 8080:3000 codecrunch-api:1.0
Open your browser and navigate to http://localhost:8080. You will receive the JSON response directly from your containerized Node.js service!
6. Port Mapping & Container Networking Explained
One of the most frequent points of confusion for beginners is port routing. By default, containers exist on a private, isolated virtual bridge network created by the Docker daemon. A service listening on port 3000 inside a container is completely inaccessible to your workstation’s web browser unless you explicitly publish that port.
The port mapping syntax follows a strict convention:
docker run -p [HOST_PORT]:[CONTAINER_PORT] image_name- HOST_PORT (Left Side): The public network port on your host operating system (e.g. 8080, 80, or 443). This is the port you type into your browser address bar:
http://localhost:8080. - CONTAINER_PORT (Right Side): The internal port configured in your application code and exposed in your Dockerfile (e.g. 3000). The container’s application listens on this port.
This separation allows you to run multiple independent instances of the same service on a single physical machine without port collisions. For example, you can run three distinct microservices all listening internally on port 3000, mapped to host ports 8081, 8082, and 8083.
7. Managing Persistent Data: Named Volumes vs Bind Mounts
By architectural design, containers are ephemeral. When a container is stopped and deleted with docker rm, any files written to its internal writable layer are permanently erased. If your application writes to an embedded SQLite database or uploads media files, that data would vanish.
To persist data beyond the container lifecycle, Docker provides two primary storage mechanisms:
- Named Volumes (Recommended for Production & Databases): Managed entirely by Docker within a dedicated storage directory on the host machine. Named volumes are isolated from direct user tampering, achieve maximum I/O performance, and persist indefinitely until explicitly deleted.
# Create a named volume for PostgreSQL data docker volume create db_data # Mount the volume to the container storage path docker run -d -v db_data:/var/lib/postgresql/data postgres:16 - Bind Mounts (Recommended for Local Development): Maps an exact, explicit directory from your host workstation directly into the container. When you edit code in VS Code, the changes reflect inside the running container in real time without rebuilding the image.
# Mount current working directory into container for live reload
docker run -d -v $(pwd):/usr/src/app -p 3000:3000 codecrunch-api:1.0
8. Multi-Container Orchestration with Docker Compose
Real-world web architectures rarely consist of a single isolated script. A complete software stack typically requires a frontend web server, an API microservice, an in-memory Redis cache, and a PostgreSQL database. Managing multiple docker run commands manually with network bridges and volume flags becomes unmaintainable.
Docker Compose solves this by allowing you to define an entire multi-container architecture in a single declarative YAML file called docker-compose.yml.
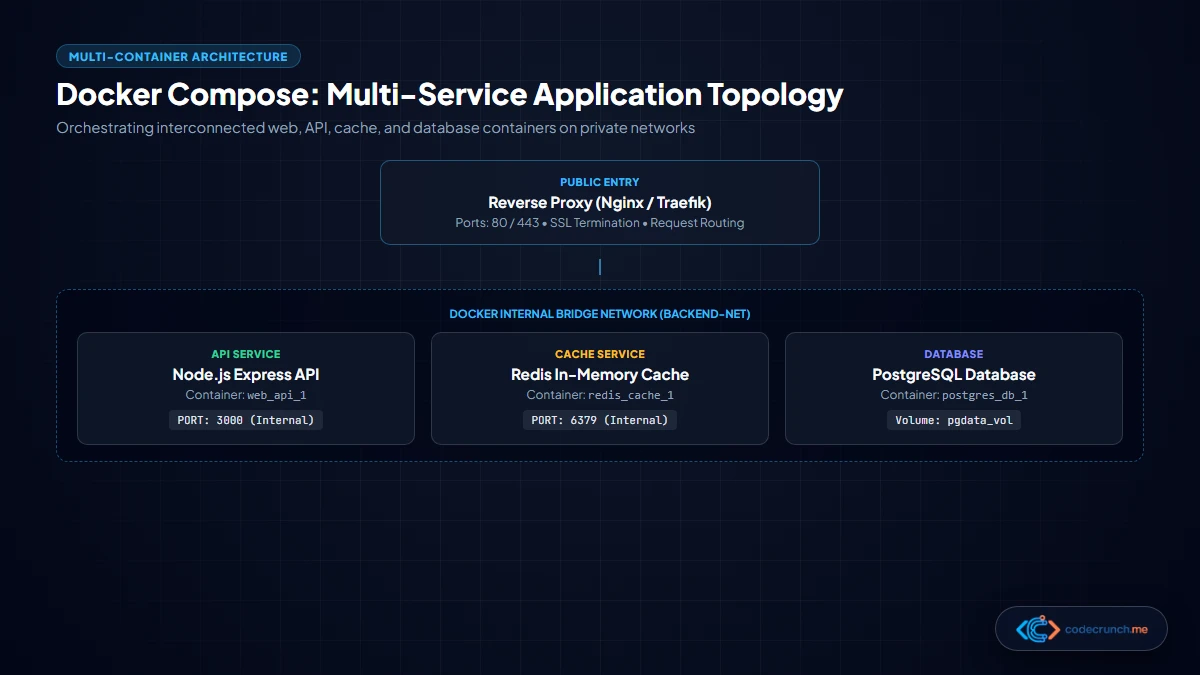
Here is a complete, production-ready docker-compose.yml file orchestrating a web application, Redis cache, and PostgreSQL database:
# docker-compose.yml
version: '3.8'

services:
  web-api:
    build: .
    container_name: cc_api_service
    restart: unless-stopped
    ports:
      - "8080:3000"
    environment:
      - NODE_ENV=production
      - DB_HOST=postgres-db
      - REDIS_HOST=cache-service
    depends_on:
      - postgres-db
      - cache-service
    networks:
      - backend-network

  cache-service:
    image: redis:7-alpine
    container_name: cc_redis_cache
    restart: unless-stopped
    networks:
      - backend-network

  postgres-db:
    image: postgres:16-alpine
    container_name: cc_postgres_db
    restart: unless-stopped
    environment:
      POSTGRES_USER: crunchuser
      POSTGRES_PASSWORD: securepassword2026
      POSTGRES_DB: crunchdb
    volumes:
      - pgdata:/var/lib/postgresql/data
    networks:
      - backend-network

volumes:
  pgdata:
    driver: local

networks:
  backend-network:
    driver: bridge
With this file in place, managing your entire multi-service infrastructure requires just two terminal commands:
# Launch and orchestrate all services in background
docker compose up -d

# View the status of all orchestrated services
docker compose ps

# Tear down the entire stack, preserving database volume data
docker compose down
Notice how Docker Compose automatically creates an internal DNS service. Inside the web-api container, connecting to the database is as simple as referencing the hostname postgres-db instead of memorizing unstable IP addresses!
9. Common Beginner Mistakes & Troubleshooting Checklist
When starting with Docker, engineers inevitably encounter a few standard failure modes. Use this diagnostic checklist to isolate and resolve issues rapidly:
| Observed Error | Underlying Cause | Diagnostic & Remediation Step |
|---|---|---|
bind: address already in use | The host port requested (e.g. 8080) is already claimed by another running container or local app. | Run netstat -ano or lsof -i :8080 to find the process, or change the left host port to -p 8081:8080. |
| Container exits immediately (Exit code 0 or 1) | The primary foreground process (PID 1) finished execution or crashed on missing dependencies. | Run docker logs <container_name> to inspect stderr and stack traces before the container shut down. |
Application cannot connect to localhost | Inside a container, localhost refers to the container itself, not the host machine. | Use host.docker.internal on Docker Desktop, or use Docker Compose service names (e.g. postgres-db). |
| Gigantic image sizes (> 1 GB) | Copying node_modules or using full Debian/Ubuntu base images instead of slim/alpine. | Add .dockerignore, use node:alpine, and implement multi-stage build patterns. |
| Permission denied inside container | The non-root container user does not have ownership of the working directory files. | Add RUN chown -R node:node /usr/src/app in your Dockerfile before switching to USER node. |
10. Frequently Asked Questions (FAQ)
Is Docker free for commercial development?
The core open-source Docker Engine, Docker CLI, and container specifications are completely free and open-source under the Apache 2.0 license. For small businesses, educational institutions, and non-commercial personal projects, Docker Desktop is also free. Commercial enterprises with more than 250 employees or over $10 million in annual revenue require a paid Docker subscription if using Docker Desktop, though headless alternatives like Rancher Desktop, Podman, or native Linux Docker Engine remain completely free.
What is the difference between Docker and Kubernetes?
Docker is a containerization technology used to build, package, and execute individual containers on a single host. Kubernetes (K8s) is a container orchestration platform designed to manage, autoscale, load-balance, and heal thousands of containers distributed across large clusters of hundreds of physical servers. You typically use Docker to create your container images and Kubernetes to orchestrate them in large-scale cloud production.
Can I run Windows containers on Linux or Linux containers on Windows?
Because containers share the host kernel, a container requires a matching host operating system kernel. You cannot run Windows containers on Linux. However, you can run Linux containers on Windows seamlessly because Docker Desktop on Windows utilizes the real Linux kernel running inside WSL 2 (Windows Subsystem for Linux) to power Linux container workloads.
Why shouldn’t I run containers as the root user?
By default, if you do not specify a user, Docker executes container processes as root (UID 0). If an attacker discovers a remote code execution vulnerability in your web application, escaping the container boundary could grant root-level privileges over the entire host server. Declaring USER node or USER 1001 ensures the process runs with minimal least-privilege security permissions.